Working with a Microcontroller for the first time
9-1-2026
If you went back in the past and told me that I would have fun working with microcontrollers, I would've laughed at you.
I've always wanted to learn C and C++, so when a class this semester revolved around programming mini robots in C++, I asked my professor for where I could start if I wanted to program hardware outside of class.
You might be wondering why I did this considering what I said at the start of this post. For some context, I've never been a fan of hardware-focused things. I've always found more enjoyment in software, mainly because it involves
logic that I can understand and write in. Hardware on the other hand is witchcraft to me; I respect those who understand all of the things that makes hardware function, since personally it scares me.
So then, why did I ask my professor on how I could mess with forbidden magic? Well, it was because of one of my roommates. This guy is an engineer, and he's messed around with microcontrollers before. When I saw one of his creations, I
asked what the jumble of wires was about, and he told me that it was a board programmed to control a mini turret. I said that it was pretty cool and moved on, but later the same day I started thinking about it. If I could somehow
wire together a microcontroller, I could program it do some cool things. I've never done it before, and I was certain it would be difficult, but with the class about robots on my schedule, I decided to go for it.
Going back to my conversation with my professor, they recommended me the board we were supposed to use in class: an ESP32. Fast forward a few days, and I'm picking up a box that contains a really cool piece of metal that I can burn words into to make it do stuff.
Before I can do that though, I need to figure out how to set it up. The box the ESP32 came in contained a lot of parts for me to use, but more importantly, it had a guidebook that told me
where I needed to go. I followed the instructions and was met with a zip file that would hopefully inform me of how I could start programming this mysterious piece of metal. I've been trying to learn Linux more recently, so as an added challenge, I decided I would
figure out how to do this mainly using the terminal. I didn't know how to properly unzip a file in bash however, so I accidentally unzipped the folder into my current directory. I figured out how to use the -d flag, and got the contents into a seperate folder.
After trying to figure out why 'open' wasn't working as a command and discovering 'xdg-open', I was met with a nice document that gave me a link to a wiki page that would begin my journey.
The first thing I had to do was install the Arduino IDE. I went over Arduino.cc, and I noticed that the IDE was hosted on GitHub. Digging a bit further, I found myself at Arduino's GitHub profile, where I noticed that
the Arduino IDE had a seperate command line interface only edition. I decided to carry over my terminal only idea, and immediately found myself at a problem. The command used to install arduino-cli was a curl command that would install the
executable into the 'bin' directory of whatever directory I was currently in. I don't have much experience with curl, so I made a test directory and ran the command. After running 'ls', I saw a new 'bin' directory appeared in the directory I was currently in,
and inside contained the arduino-cli executable. When I looked back at the command, I noticed that there was an optional BINDIR parameter I could supply to specify what directory I wanted to install the executable into, and in an example, it referenced
a bin directory held in the user's .local directory in their home folder. I'm still new to what directories serve which purposes on Linux, but I knew that I could install the arduino-cli package into my .local/bin
directory in order to be able to run the arduino-cli anywhere on my computer. I'll go into detail on why this works later on, but for now, it's important to note that I could only do this so as long as the arduino-cli executable was in my user's .local/bin directory.
After installing the executable, the GitHub pages site for arduino-cli had a nice 'Getting Started' section that I could read. The first thing I needed to do was install the core for ESP32. After following the directions from the
arduino-cli page, I found what I needed by running 'arduino-cli core search esp32'. After installing the core, I ran 'arduino-cli board listall esp32' in order to look for my board's FQBN, or 'Fully Qualified Board Name'.
The FQBN was used to tell arduino-cli what specific board I was working with so it could compile and upload the code I supplied specific to how the board needed it. There was a vast variety of 'ESP32' boards, so I looked at the guidebook the ESP32 came with
to see if there was a name for my board in particular. I ended up finding the name 'ESP32 Development Board', so I checked for that in the list. After finding it,
I noted that my board's FQBN was just 'esp32:esp32:esp32' ('esp32' was the vendor name, 'esp32' was the architecture name, and 'esp32' was the board's name).
Now we can move on to trying to upload code to the board. The zip file from earlier had a set of code examples and tutorials that I could use. I decided that my goal would be to try and get some text onto an OLED
display the ESP32 came with. To begin, the tutorial for the display said I had to install two libraries onto my computer so that the microcontroller could talk to the display.
Namely, the library I needed was 'adafruit_ssd1306'. I was able to find what I needed by running 'arduino-cli lib search adafruit_ssd1306'. Luckily, the adafruit_ssd1306 library needed the other library I had to install as a dependency,
so it would be automatically installed. After installing it with 'arduino-cli lib install "Adafruit SSD1306"', I had to
switch to the real world for a bit. The ESP32 needed to be put onto some breadboards, and the box the ESP32 came with had two of them. I struggled a bit on figuring out how I could hook them together, but another roommate of mine
(who also happens to be an engineer) showed me that you could just push one into the other through the
adhesive on the back of the board into the clip areas. I'm not certain if thats actually how it's done, however it worked, though I noticed that the boards would bend at their connection point. This would end up being a good thing, as I quickly found out
that the ESP32 did not fit nicely into the two boards, and the instructions had stated to bend the boards a bit so that you could connect the ESP32 to both.
After wiring together the setup as shown by a visual example and plugging in my board, I noticed that the OLED display was not turning on. I guessed this was because there wasn't any code uploaded, so I went to the OLED display code
example from the tutorial, compiled it, and then uploaded it. The upload command takes 3 parameters: The port your device is connected to, your board's FQBN, and then the sketch you want to upload. I was able to figure out
what port the ESP32 was connected to by running 'arduino-cli board list', which told me that it was connected to port '/dev/ttyUSB0'. I took the port and my FQBN from earlier and ran the command
'arduino-cli upload -p /dev/ttyUSB0 --fqbn esp32:esp32:esp32 OLED_code.ino', only to be greeted with an error stating 'permission denied'. Alright, I'll try running it with sudo.
'bash: arduino-cli: command not found...'
Right. 'sudo' when put in front of a command temporarily switches you to the user 'root', which is a user that has the highest privileges on Linux machines, and runs said command as root. This is a problem because of how
I installed arduino-cli. Say you have an executable called 'cool-executable' in your current directory. If you want to execute it, you have to reference it in your command.
You would do this by running './cool-executable', since './' points to your current directory. As it turns out, a command like 'ls' (which is used to list files) is also an executable. The thing is,
you can run ls without specifying its executable's directory, and it will still work. This is because if you don't supply a directory when trying to run a command, your machine will search for executables in
directories that are listed in your 'PATH' environment variable.
PATH is a list of directories that are searched through when you try and run an executable with no specified directory. On Linux machines, you can see this list of directories by running 'echo $PATH'. The command 'ls' is in one of
those directories. Namely, it can be found in the /bin directory, which is the directory for executables integral to a system's functionality. With this in mind, the PATH variable will be different depending on the user. If you switch
to root by running 'sudo su' and run 'echo $PATH', you'll notice that the directories that are checked are different compared to running 'echo $PATH' as a normal user. More importantly, you'll notice that root has its own .local directory.
I had installed arduino-cli under my user's .local/bin directory. When I try to run arduino-cli with sudo, it looks for arduino-cli under root's .local/bin directory, not mine. Unfortunately, I couldn't just navigate to my user's .local/bin directory
as root and run ./arduino-cli with the command I needed, since arduino-cli creates a folder called 'Arduino' in a users home folder to store installed files. I had already installed everything under my user, so it wouldn't exist for root unless I
reinstalled everything again as root.
Instead of doing that though, I wanted to see if I could somehow grant my user permission, so I looked back at the 'permission denied' error message. The error mentioned that I could 'add the user to the dialout or uucp groups'.
I didn't know what this was, so I turned to the internet. From what I gathered, the dialout group is a group on Linux that allows users to access physical ports on a device.
You can actually see this yourself if you plug in a device and run 'ls -l X', with X being the directory to
your port (in my case, it would be 'ls -l /dev/ttyUSB0'). Therefore, I had to somehow add my user to the dialout group. While looking for answers, I came across an askubuntu post that talked about the 'usermod' command.
specifically, it said to run 'usermod -a -G dialout $USER'. This command translates to: append the current user running the command to group 'dialout'. I ran the command and was hit with a permission error, so I ran it as sudo. I got nothing in my output, so
I assumed it had been successful. I ran the upload command again, but I still had the same error. I was confused, and decided to check what groups my user was in. Problem was, I didn't know how to, so I did a quick
search and found out about the command 'groups'.
Running groups showed me two groups: myself, and wheel. This meant that I wasn't in dialout, so I looked back at the usermod command. I noticed that I was running sudo with the parameter $USER, and I had a question. Is $USER
resolving to my user? Or is it resolving to 'root'? I know that sudo temporarily switches you to root, but I didn't know if the parameter was resolving before I switched to root or after I switched. Therefore, instead of
running '$USER' in the command, I switched it to my username in text, and ran it. I re-ran the groups command, yet I still wasn't in dialout. After checking the manual for groups with 'man groups', I noticed that you could supply
a username to specify what user's groups you wanted to see, so I typed 'groups root' to see if I had accidentally added root to the dialout group. The output told me that root was not in any other groups except itself,
meaning that the $USER parameter resolves before you switch to root. Out of curiosity, I also ran 'groups' with my username, and got a strange result. I was apart of myself, wheel, and dialout.
I was confused. My user was in the dialout group, but running groups by itself told me I wasn't in the dialout group. I tried logging out and back in, but still nothing. I was out of ideas, and so I turned to the internet once more.
Unfortunately, I was then told that the answer to my solution was to log out and log back in. I had already tried this, and it still didn't work. As a last ditch effort, I forwarded my problem to Luna (GPT-5.6), which
told me again that I needed to log out and log back in, OR restart my computer. I figured a restart wouldn't hurt, so I went ahead with it. I logged back in after my computer booted, and ran groups.
I was then met with being in the groups of myself, wheel and dialout.
This is where I learned that group changes are not instantly applied to an active user. Apparently, logging out and logging back in usually updates this, but I don't know why it didn't work for my situation. It could be because I
only have one user on my computer other than root, but I'm ultimately not sure. I decided to leave my confusion for a research session, and went back to my first problem of my OLED display not showing anything. I successfully ran
the upload command for the OLED example code, but was greeted with nothing. The ESP32 was on, but nothing was happening. I didn't want to potentially break something, so I took a break and reached out to my professor
for the robot class I had mentioned at the start. We met a few days later and started troubleshooting. After my professor taught me a bit more about how microcontrollers worked, I decided to look at the code I was uploading.
When doing this, I saw a line that confused me.
'Wire.begin(21, 22); // SDA=21, SCL=22'
My professor said that this was how the code was stating what wires should be used to transfer data from the microcontroller to the display, but these weren't the wires that the tutorial told me to connect. The visual example showed me that wire 21 should be connected
to 'SCL' on the display, and that wire 22 should be connected to 'SDA' on the display, which was the opposite of what the code wanted. Seeing this, I switched the two wires, and hit the button to reset the board.
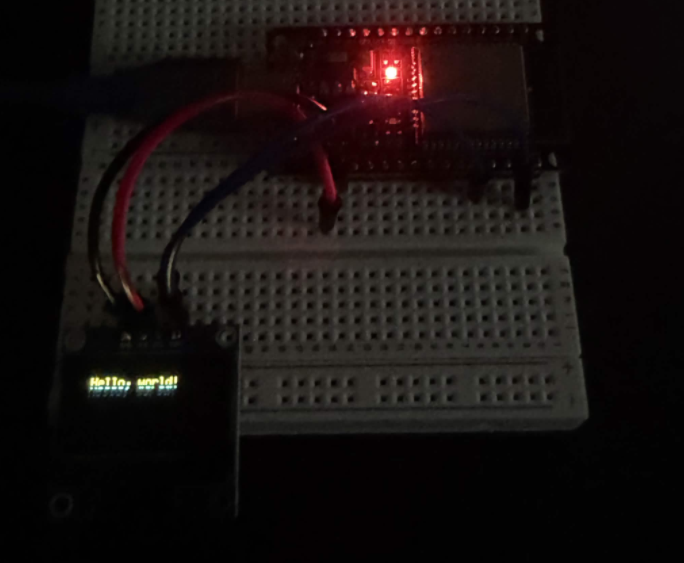
hello microcontroller
I've never been excited by 'Hello, world!' more than I have now. As I said before, I've only ever written code for software, meaning everything I created was bound to computer drives. As basic as this may be, I thought this was really cool, since it demonstrated to me that there is a whole different field of programming that I could experiment with and learn about. Overall, the journey of trying to figure out how to get a screen to display pixels taught me more than I thought it would. I plan to make some cool stuff with the ESP32 as I learn C, so if you're interested, stick around for the project and blog posts. I appreciate you reading this, especially since it's my first time blogging about a learning experience. Hopefully it was entertaining, but if not, I'd like to hear your feedback. You can contact me through any method in my contact page here if you're up for it. Otherwise, take care.